Depth of Field Calculator (DoF) & Hyperfocal Distance
Depth of Field & Hyperfocal Distance Calculator
In the field, depth of field is rarely an abstract number. It decides whether the foreground grasses stay sharp in a wide landscape, whether a distant ridge holds detail behind your subject, or whether a wildlife image keeps just enough of the eye and face in focus to feel right.
This tool helps you calculate hyperfocal distance, near and far focus limits, total depth of field, and diffraction tradeoffs using your sensor, focal length, aperture, and subject distance — so you can make stronger lens and focus decisions before pressing the shutter.
What this tool helps you do:
Calculate hyperfocal distance for front-to-back sharpness
See near and far depth-of-field limits
Compare sensor-based and pixel-pitch CoC methods
Check when stopping down may start trading sharpness for diffraction
Strong focus decisions start with the shot you are trying to make. In a landscape, that may mean holding foreground texture and distant background in acceptable focus. In wildlife, it may mean keeping the eye sharp while letting the rest of the frame fall away naturally. This planner helps you see how focal length, aperture, sensor size, and subject distance work together before you shoot.
Enter your camera format, focal length, aperture, and distance to calculate hyperfocal distance, near and far focus limits, total depth of field, and diffraction tradeoffs in one place.
How to Use the Tool
This calculator is built for a practical field question: how much of the scene will actually look acceptably sharp at this lens, aperture, and distance? In a landscape, that may mean holding foreground and background together. In wildlife, it may mean protecting the eye and face while letting the background fall away cleanly.
The goal is not just to generate numbers. The goal is to make better shooting decisions before the moment arrives — choosing whether to focus at the subject, move toward hyperfocal distance, change aperture, or rethink the composition entirely.
1. Set Your Camera Format
Choose your sensor size first, or enter custom dimensions if needed. Sensor format affects circle of confusion, which changes how strict or forgiving the depth-of-field result will be.
2. Choose Your CoC Method
Use the classic sensor-based method for general planning, or switch to pixel pitch when you want a stricter standard for high-resolution cameras, large prints, or more demanding sharpness expectations.
3. Enter Lens, Aperture & Distance
Add your focal length, aperture, and subject distance. These three choices drive the most important field tradeoffs: how much will be sharp, how fast diffraction grows, and whether hyperfocal focus makes sense for the scene.
4. Read the Results Like a Field Plan
Review hyperfocal distance, near and far limits, and the diffraction note together. Then decide whether to focus where you are, shift to hyperfocal, open up, stop down, back up, or plan a focus stack instead.
Best way to use this page: test your focus plan here first, then pair it with the Camera Settings Calculator and Field Tools system so aperture, shutter speed, focal length, and real-world field conditions all support the same final image.
Understanding Depth of Field
In practical field terms, depth of field is the zone of acceptable sharpness in front of and behind your focus point. It is not an all-or-nothing line. It is a range shaped by focal length, aperture, subject distance, sensor size, and how strictly you define “sharp enough.”
That is why depth of field decisions are never just technical. They directly affect how the image feels — whether a landscape holds together from foreground to distance, or whether a wildlife portrait isolates the subject against a softer background.
What increases depth of field
Shorter focal lengths, smaller apertures, and greater subject distances usually increase the zone of acceptable sharpness. This is why wide-angle landscape setups often make front-to-back sharpness easier to manage than long telephoto scenes.
What decreases depth of field
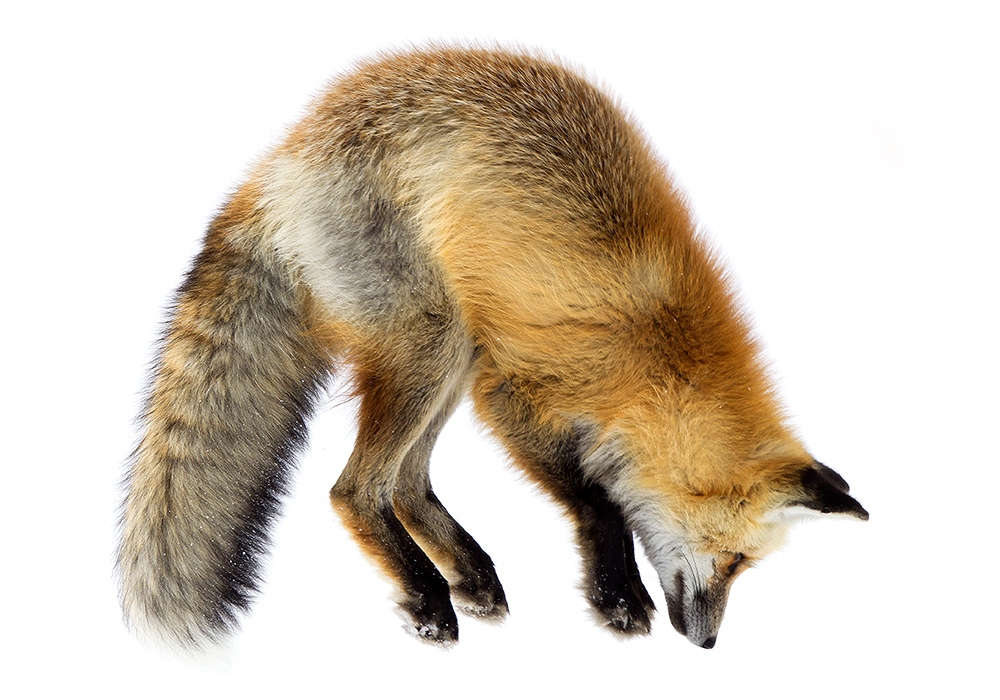
Longer focal lengths, wider apertures, and closer subject distances reduce the sharp zone quickly. That is why wildlife and telephoto work often demand more exact focus placement than wide landscape photography.
Acceptable Sharpness Is the Key
Depth of field is based on what looks acceptably sharp, not perfectly sharp at pixel level. That is why circle of confusion matters. A classic CoC gives a practical field result, while a pixel-pitch CoC gives a stricter standard for high-resolution sensors, large prints, and close inspection.
In other words, depth of field is partly an optical fact and partly a viewing decision. The sharper you expect the final image to be, the tighter your acceptable focus zone becomes.
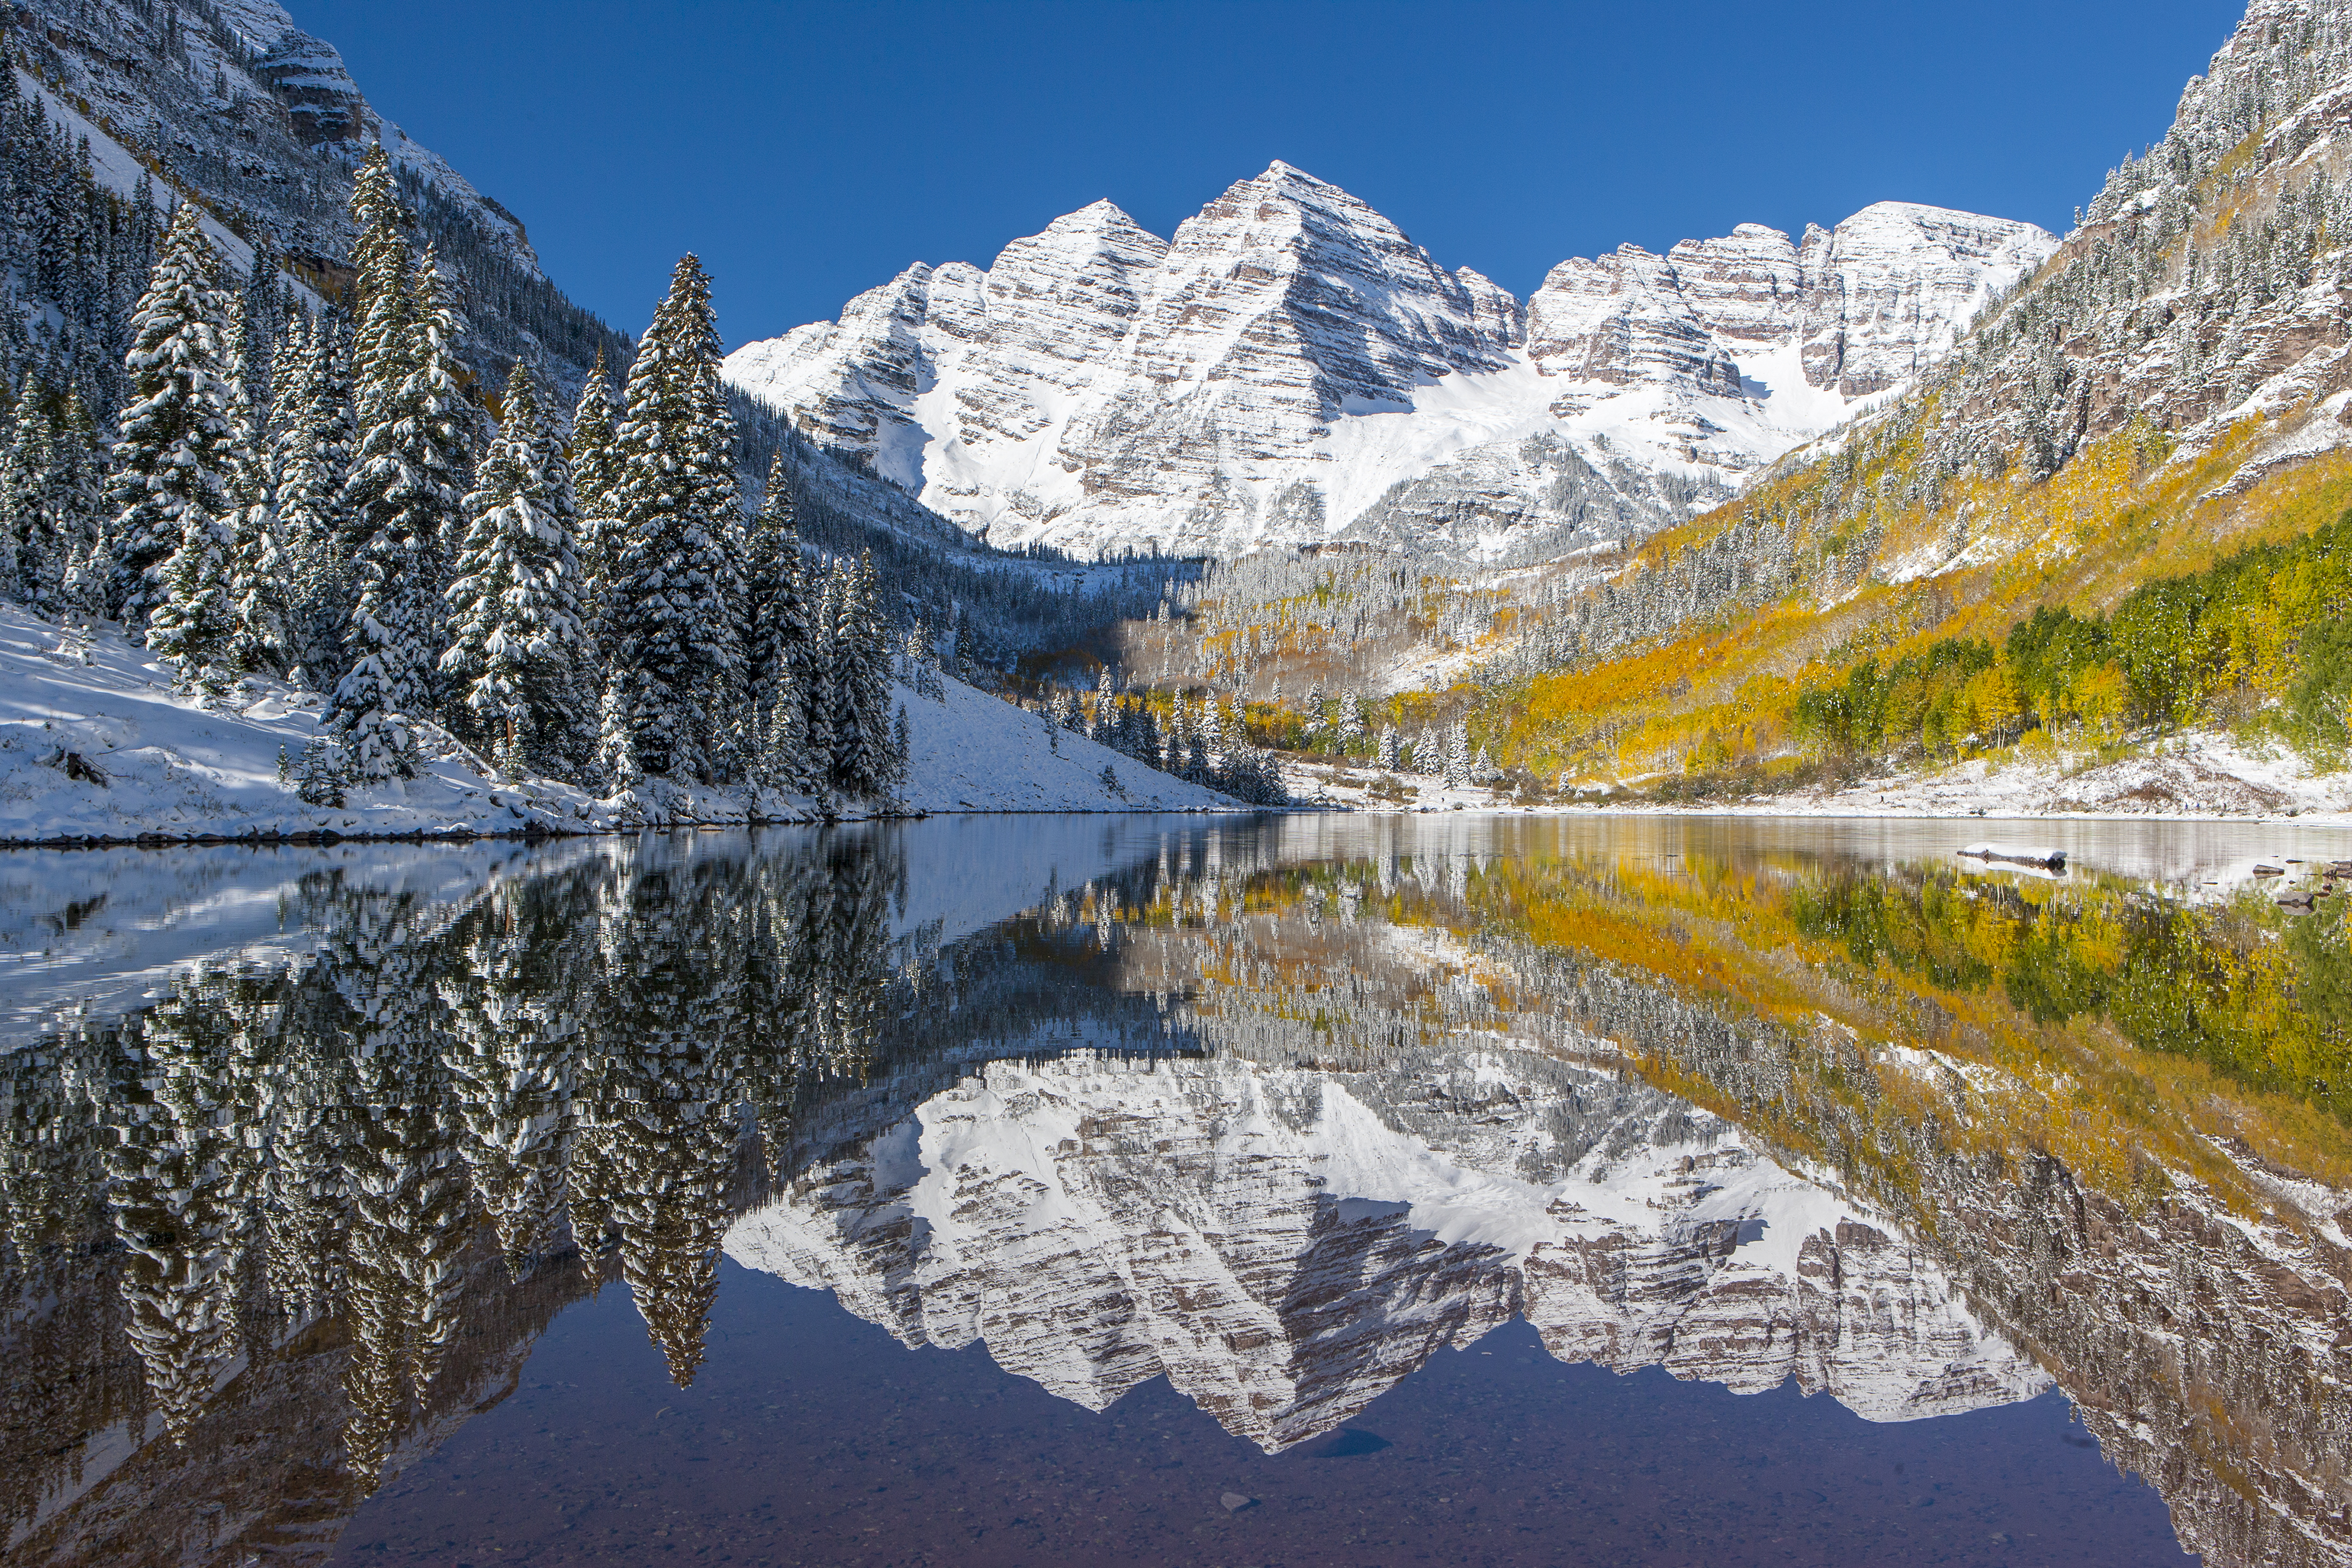
Simple field example: a 24mm lens at f/11 focused several meters into a scene may hold foreground to distance together cleanly, while a 400mm lens at f/5.6 focused on a bird may only keep a thin slice of the subject sharp. The tool helps you see that difference before you shoot.
Hyperfocal Distance
Hyperfocal distance is one of the most practical tools in landscape photography. It defines the focus distance where everything from roughly half that distance to infinity appears acceptably sharp.
When you focus at hyperfocal, you are not focusing on your subject — you are positioning your focus point to maximize usable depth of field across the entire scene.
What Hyperfocal Does
Focusing at hyperfocal pushes the far limit of depth of field to infinity while pulling the near limit as close as possible. This makes it one of the most efficient ways to hold foreground and background together in a single frame.
When to Use It
Hyperfocal focus works best in wide-angle landscapes where you want front-to-back sharpness. It becomes less practical at longer focal lengths, where hyperfocal distances grow large and near focus limits move farther away.
What It Looks Like in the Field
If your hyperfocal distance is 6 meters, focusing there will place your near limit around 3 meters and your far limit at infinity. That means anything closer than 3 meters may fall out of acceptable focus, even if the background looks sharp.
This is where composition matters. If your foreground sits closer than the near limit, you either need to adjust your aperture, change your focus point, move your camera, or consider focus stacking instead of relying on hyperfocal alone.
Field takeaway: hyperfocal is a powerful tool, but not a default setting. Use it when it supports the scene — not when it forces the scene to fit the math.
Landscape vs Wildlife Use
Depth of field behaves very differently depending on the type of image you are trying to make. The same settings that work for a wide landscape often fail completely in a wildlife scenario — and vice versa.
Understanding how depth of field shifts between these two situations helps you choose the right focus strategy before you are in the moment.
Landscape Photography
Often uses wide to mid-range focal lengths
Goal is front-to-back sharpness across the scene
Hyperfocal distance is frequently useful
Smaller apertures increase depth of field — but introduce diffraction tradeoffs
In practice, landscape work is about balancing coverage and clarity — holding enough of the scene in focus without stopping down so far that fine detail starts to soften.
Wildlife Photography
Often uses longer focal lengths (200mm–600mm+)
Depth of field becomes very shallow quickly
Precise focus placement is critical (usually on the eye)
Background separation is often part of the image design
Wildlife work is usually about selective focus — keeping the subject sharp while letting the background fall away naturally.
What This Means in the Field
In landscapes, depth of field is often something you are trying to maximize — but within limits. In wildlife, depth of field is something you are often trying to control or reduce, while still keeping the critical parts of the subject sharp.
The key is recognizing that depth of field is not a fixed goal. It is a tool you shape depending on the subject, the scene, and how you want the image to feel.
Field takeaway: use depth of field to support the image, not to force it. In some scenes, more depth of field improves the shot. In others, less depth of field makes the image stronger.
Diffraction & Tradeoffs
Stopping down increases depth of field — but it also introduces diffraction. As the aperture gets smaller, light spreads out more as it passes through the lens, softening fine detail across the image.
That means there is always a tradeoff: more depth of field vs. maximum sharpness. The goal is to find the balance point that works best for the scene you are photographing.
Stopping Down Further
Increases depth of field
Pulls the near limit closer
Helps hold foreground and background together
Introduces increasing diffraction softness
Opening Up the Aperture
Reduces depth of field
Improves overall sharpness and contrast
Helps isolate subjects from the background
Requires more precise focus placement
Finding the Balance
In many real situations, the sharpest image is not created at the smallest aperture. Instead, it comes from choosing an aperture that gives enough depth of field for the composition while staying within a range where diffraction has not noticeably reduced detail.
This is why the diffraction check in the tool matters. It helps you see when stopping down further may no longer improve the image, even if depth of field continues to increase.
Field takeaway: do not chase maximum depth of field blindly. The strongest images come from balancing focus coverage, lens performance, and the way the scene is meant to be experienced.
Helpful Guides & Next Steps
This calculator shows how focus behaves — but strong images come from combining depth of field with exposure, light, lens choice, and real field conditions.
Use the tools and guides below to connect focus decisions with the rest of your field workflow.
How this fits together: use this tool to define your focus plan, confirm exposure with the Camera Settings Calculator, align with light timing, and verify your position in the field. That combination is what turns technical settings into a finished image.
Next step in the field: once you have a focus plan, test it on location if possible. Check foreground distance, confirm background clarity, and adjust before the moment happens so you are not guessing under pressure.
Naturepedia Connections
Depth of field is not just a camera setting — it reflects how light, distance, and perception interact in the real world. What appears sharp in an image follows the same patterns that shape how we see landscapes, wildlife, and space in the field.
Light & Photons
Sharpness begins with light. The way light travels, spreads, and interacts with a lens directly shapes resolution, diffraction, and the final clarity of an image.
Depth of field is based on acceptable sharpness, not absolute clarity. What we perceive as “in focus” depends on distance, scale, and how the eye resolves detail.
Scenes in nature are experienced at distance. Depth of field translates that experience into an image, balancing how much of the environment is held together visually.
In wildlife photography, focus decisions often follow behavior. Where an animal moves, how it presents itself, and how you position yourself all influence depth-of-field choices.
Depth of field sits at the intersection of light, distance, perception, and environment — the same foundation that connects the entire Naturepedia system.
Practical questions about hyperfocal distance, circle of confusion, diffraction, and using depth of field in the field.
What circle of confusion setting should I use?
Start with the classic sensor-diagonal method for general field planning. Use pixel-pitch CoC when you want a stricter standard for high-resolution sensors, larger prints, or closer inspection.
Does stopping down always improve depth of field?
It increases depth of field, but only up to a point does that help overall image quality. As apertures get smaller, diffraction softens fine detail, so more depth of field does not always mean a better final image.
When should I use hyperfocal distance?
Hyperfocal distance is most useful in wide-angle landscape work when you want the broadest possible zone of acceptable sharpness from foreground toward infinity. It is usually less practical with long telephoto lenses.
Why does the far limit sometimes show infinity?
That happens when your focus distance reaches or passes the hyperfocal distance. At that point, the far depth-of-field limit extends to infinity under the chosen CoC standard.
Is hyperfocal focus the best choice for telephoto landscapes?
Not always. With longer focal lengths, hyperfocal distances grow quickly and near limits can remain too far away. In those situations, careful focus placement or focus stacking is often a better solution.
Does this calculator work for wildlife photography too?
Yes, but the way you use it is different. In wildlife photography, the tool is often more useful for understanding how shallow depth of field becomes, how precisely you need to focus, and how much subject separation you will get.
Does this tool replace field testing?
No. It gives you a strong starting point for focus decisions, but real-world conditions still matter. Foreground distance, subject movement, lens performance, and viewing expectations all affect how the final image looks.
About the Author
Robbie George
is a National Geographic–published nature photographer whose field work is built around timing, light, positioning, and real-world observation.
Depth of field and focus decisions are not abstract calculations in the field — they are part of how a scene is interpreted. Whether working in landscapes or wildlife photography, Robbie’s approach centers on understanding how focus, distance, and light come together to shape the final image.
Through the Field Tools system, Naturepedia, and his photography work, he connects technical planning with deeper patterns in perception, environment, and natural observation — helping photographers move from guessing settings to making intentional decisions in the field.
The presence of this badge signifies that this business has officially registered with the Art Storefronts Organization and has an established track record of selling art.
It also means that buyers can trust that they are buying from a legitimate business. Art sellers that conduct fraudulent activity or that receive numerous complaints from buyers will have this badge revoked. If you would like to file a complaint about this seller, please do so here.
Verified Returns & Exchanges
The Art Storefronts Organization has verified that this business has provided a returns & exchanges policy for all art purchases.
Description of Policy from Merchant:
What is your Policy on Returns/Exchanges/Refunds?
I take great pride in my work and prints, and I want you to be completely happy with your investment in my nature art. If for any reason you are unsatisfied with your print, you may return it within 14 days of delivery, and/or exchange it for another print. Prints must be returned in new condition, packaged carefully in the original packaging if possible. Your refund will be issued as soon as I receive the returned print. Please contact me if you would like to arrange a return or exchange.
In the event that you receive a damaged or defective print, please let me know within 7 days of receipt, and I will arrange for a new print to be shipped to you at no additional cost.
Verified Secure Website with Safe Checkout
This website provides a secure checkout with SSL encryption.
Verified Archival Materials Used
The Art Storefronts Organization has verified that this Art Seller has published information about the archival materials used to create their products in an effort to provide transparency to buyers.
Description from Merchant:
Fine Art Prints are made with high-quality archival inks on fine art papers using a high-resolution large format inkjet printer. Our premium archival inks produce images with smooth tones and rich colors. Prints are made with care on your choice of exquisite Fine Art Papers using a high-resolution large format inkjet printer. https://www.graphikprintworks.com
Become a supporter of Robbie George Photography and be the first to receive new content and special promotions.
“Every image is a field. Every quote is a key. Welcome back to the rhythm.” ~Robbie
Cart
Your cart is currently empty.
Saved Successfully.
This is only visible to you because you are logged in and are authorized to manage this website. This message is not visible to other website visitors.
Import From Instagram
Click on any Image to continue
This Website Supports Augmented Reality to Live Preview Art
This means you can use the camera on your phone or tablet and superimpose any piece of nature art onto a wall inside of your home or business.
To use this feature, Just look for the "Live Preview AR" button when viewing any piece of nature art on this website!