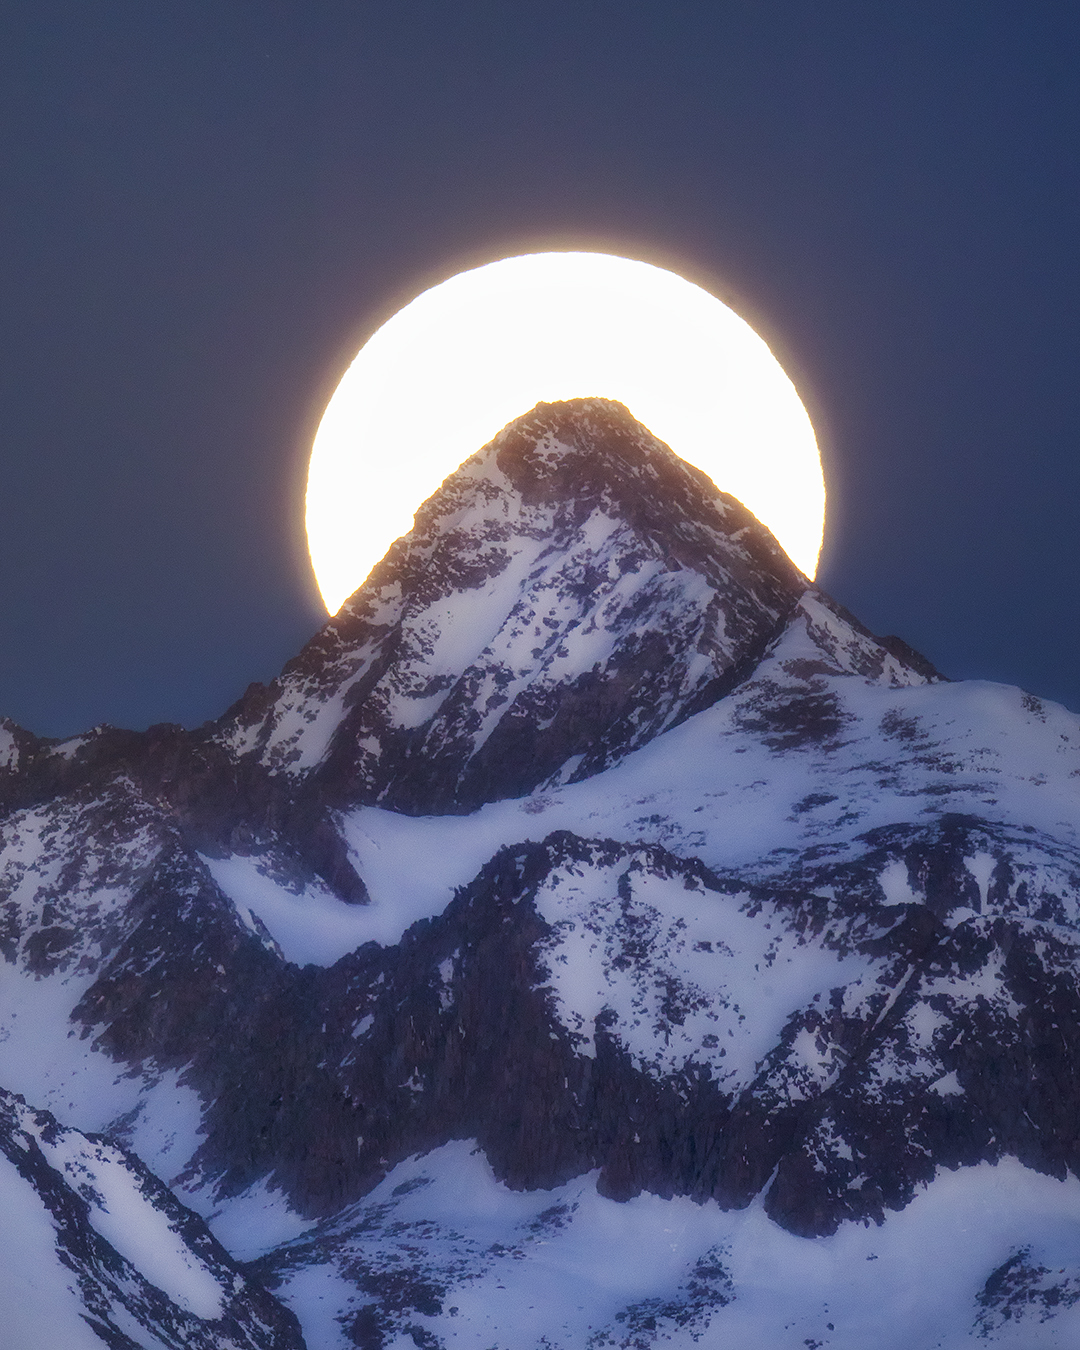
In the field, alignment is everything. If you are trying to place the moon over a mountain ridge, line up sunrise behind a lighthouse, or time the sun against a skyline edge, the shot usually comes down to one thing: where you stand and when the alignment happens.
This planner helps you find the dates and times when the Sun or Moon matches the bearing of your chosen landmark, so you can plan your shooting position, evaluate horizon clearance, and arrive with a stronger field strategy before the moment unfolds.
What this tool helps you do:
Find alignment dates for the Sun or Moon
Match azimuth to a ridge line, lighthouse, skyline, peak, or horizon target
Strong alignment images usually begin long before the light arrives. This planner helps you test whether the Sun or Moon will pass through the same directional line as your chosen subject from your shooting position, and whether it will be high enough above the horizon to work in the field.
Enter your coordinates, landmark bearing, tolerance, horizon height, and date range. The planner will scan for likely AM and PM alignment windows so you can narrow the best days to scout, refine your position, and prepare before the moment happens.
How to Use the Tool
This planner is built for a real field question: when will the Sun or Moon move into the same directional line as the subject I want to photograph? Start with the shot in your mind first — a moonrise over a ridge, sunrise behind a lighthouse, or the moon clearing a skyline edge — then use the planner to narrow the timing and position before you head out.
The goal is not just to generate dates. The goal is to create a stronger field plan: where to stand, what direction matters, how much tolerance you want, and whether the Sun or Moon will actually clear the terrain in a way that works visually.
1. Set Your Shooting Position
Enter your latitude and longitude manually or use your device location. This should be the place you expect to stand when making the image, not the location of the mountain, lighthouse, skyline, or other landmark itself.
2. Enter the Landmark Bearing
Add the compass bearing from your shooting location to the subject you want to align with. That directional line is what the planner compares against the Sun or Moon path as it scans for matches.
3. Adjust Tolerance & Horizon
Use a tighter tolerance for more exact alignments and a wider one if you want more possible dates to review. Horizon height helps account for ridgelines, terrain, buildings, or elevation that can block the alignment even when the bearing is correct.
4. Scan the Window
Choose Sun or Moon, set the start date and scan range, then review the AM and PM windows the planner returns. Use those results as a planning filter, then verify access, sightlines, weather, and field conditions before the shoot.
Best way to use this page: start with a specific image idea, use the planner to find likely alignment windows, then pair it with the Golden Hour & Moon Phase Planner and Nature & Wildlife Photography Maps so timing, light, and access all support the final field decision.
Understanding Azimuth Alignment
In practical field terms, azimuth is the compass direction from where you are standing to where the Sun or Moon appears. If your landmark sits on a bearing of 92°, the alignment happens when the Sun or Moon moves into that same directional line from your position.
That is why alignment photography is never just about the subject itself. It depends on your exact shooting position, the bearing to the landmark, and the timing of celestial movement. Change your position, and the alignment changes with it.
What Azimuth Controls
Azimuth controls the left-to-right directional match between the Sun or Moon and your chosen subject. It tells you whether the celestial body is moving into the same line as a peak, lighthouse, skyline edge, tree, or distant ridge from the place where you are standing.
What Azimuth Does Not Control
Azimuth alone does not tell you whether the Sun or Moon is high enough to clear terrain, buildings, ridgelines, or haze. That is why altitude and your horizon-height setting matter too. A perfect bearing match can still fail if the subject is blocked.
Think of It This Way
For field planning, azimuth is the directional line. Altitude is the height above the horizon. The strongest alignment images usually happen when both are working together — the Sun or Moon is in the right horizontal position and also high enough to appear cleanly where you want it.
This is why scouting matters so much. Even if the planner gives you the right azimuth window, a slight position change, an uneven ridge, a hidden treeline, or a blocked horizon can completely alter the final image.
Simple field example: if you want the moon to rise directly over a mountain peak, the peak must sit on the same bearing line as the moon at that moment, and the moon must also be high enough to clear the ridgeline in a way that works through your lens.
Sun vs Moon Alignment Planning
The alignment logic is the same for both — you are matching a directional line between your position and a subject. But in the field, the Sun and Moon behave very differently, and those differences change how you plan the shot.
Choosing between them is less about theory and more about what kind of image you want to create and how precise your setup needs to be.
Sun Alignment
Moves on a consistent daily path that shifts gradually with the seasons
Alignment windows repeat predictably throughout the year
Works well for silhouettes, ridgelines, and directional light
Brightness limits detail — often favors shape over texture
In the field, Sun alignments are usually about timing precision. The window can be short, and light changes quickly near the horizon, so positioning and readiness matter.
Moon Alignment
Shifts position more noticeably from day to day
Alignment opportunities are less frequent and more timing-sensitive
Works well with long lenses for compression and scale
Can be photographed in lower light for better surface detail
Moon alignments reward advanced planning and positioning, especially when matching scale with distant peaks, structures, or horizon features.
What This Means in the Field
Sun alignments tend to be easier to repeat and refine over time. You can revisit the same location across seasons and adjust your position as the Sun shifts along the horizon.
Moon alignments, on the other hand, are often more precise and less forgiving. The combination of timing, distance, and positioning makes them more difficult — but also more unique when everything comes together.
Field takeaway: use the Sun when you want repeatable seasonal alignments and strong directional light. Use the Moon when you want scale, compression, and more distinctive alignment moments that stand out.
Field Position, Timing & Visibility
The planner gives you alignment windows — but the actual image depends on what happens in the field.
Position, timing, and visibility all have to work together for the alignment to actually show up the way you expect.
Most missed alignment shots are not caused by bad calculations — they happen because one of these three pieces is off when it matters.
Position
Your exact location determines the bearing. Even small movements left or right can shift the alignment enough to miss the shot completely.
Always confirm your position on site and refine it before the alignment window begins.
Timing
Alignment windows are often short. The Sun moves quickly near the horizon, and the Moon can shift noticeably from minute to minute.
Be in position early, set up ahead of time, and expect the best moment to happen fast.
Visibility
Terrain, trees, buildings, haze, and elevation all affect whether the alignment is actually visible.
A perfect azimuth match will still fail if the Sun or Moon is hidden or blocked when it reaches that line.
Why Horizon Height Matters
The horizon height setting in the planner helps approximate how much elevation the Sun or Moon needs to clear before the alignment becomes visible.
This is especially important when working with mountains, ridgelines, or elevated skyline features.
Without accounting for elevation, you may get a perfect directional match — but the Sun or Moon could still be hidden below the terrain when the moment arrives.
Field example: if you are aligning the Moon with a distant peak, the planner may show the correct azimuth — but if the Moon is still below the ridgeline or obscured by terrain, the shot will not work. Both direction and elevation have to line up together.
Best practice: combine this planner with Photography Maps and field locations so you can confirm sightlines, access, and real-world visibility before the alignment window.
Helpful Guides & Next Steps
This planner helps you identify alignment windows — but strong results come from combining direction, timing, light, and location into one complete field plan.
Use the tools and guides below to refine your positioning, confirm access, and build a more reliable shot before you head into the field.
How this fits together: use this planner to find alignment windows, confirm light and phase with the
Golden Hour & Moon Phase Planner,
verify positioning with
maps,
and scout your location before the shoot. That combination is what turns a calculated alignment into a usable field result.
Next step in the field: once you identify a strong alignment window, visit the location ahead of time if possible.
Confirm sightlines, check for obstructions, and fine-tune your exact shooting position so you are ready when the moment happens.
Naturepedia Connections
Alignment planning begins as a field decision — but it connects to deeper patterns of light, movement, and seasonal change.
The Sun and Moon do not move randomly. Their paths are part of larger systems that shape visibility, timing, and how scenes come together in nature.
Light & Photons
Every alignment image begins with light. How the Sun or Moon carries light across distance determines visibility, contrast, and the final image.
The position of the Sun shifts through the seasons, and the Moon follows its own cycle. Alignment opportunities are tied directly to these repeating patterns.
At a deeper level, alignment planning sits at the intersection of light, time, and landscape — the same foundation that runs through the entire Naturepedia system.
Practical questions about alignment planning, bearings, horizon height, and what to expect in the field.
How do I find the correct bearing for my landmark?
Use a compass in the field or a mapping tool. Draw a line from your shooting position to the landmark and read the bearing in degrees. Enter that value into the planner with a small tolerance (usually ±1°).
What tolerance should I use?
Start with ±1° for precise alignments. Increase to ±2–3° if you want more flexibility or are still refining your position. Wider tolerances return more results but reduce alignment accuracy.
What does horizon height mean?
Horizon height accounts for terrain, buildings, or elevation blocking your view. If your subject sits above the true horizon (like a mountain ridge), increase this value so results only appear when the Sun or Moon is high enough to be visible.
Why are there no alignment results?
Try increasing your tolerance, scanning more days, or adjusting your location. Some alignments only occur at specific times of the year based on seasonal movement.
Is the Sun or Moon better for alignment photography?
The Sun is more predictable and easier to repeat. The Moon offers more dramatic results with scale and detail but requires more precise timing and positioning. Most photographers use both depending on the shot.
Does this tool guarantee the shot will work?
No. This tool gives you alignment timing and direction. Final results still depend on weather, visibility, terrain, and your exact shooting position. Field scouting is always recommended.
About the Author
Robbie George
is a National Geographic–published nature photographer whose field work is built around timing, light, positioning, and real-world observation.
Tools like the Sun & Moon Azimuth Alignment Planner reflect the same approach used in the field — where alignment is not guesswork, but a combination of direction, timing, terrain, and preparation working together.
Through the Field Tools system, Naturepedia, and his photography work, Robbie connects practical planning with deeper patterns in light, landscape, and seasonal movement — helping photographers move from reactive shooting to intentional field decisions.
The presence of this badge signifies that this business has officially registered with the Art Storefronts Organization and has an established track record of selling art.
It also means that buyers can trust that they are buying from a legitimate business. Art sellers that conduct fraudulent activity or that receive numerous complaints from buyers will have this badge revoked. If you would like to file a complaint about this seller, please do so here.
Verified Returns & Exchanges
The Art Storefronts Organization has verified that this business has provided a returns & exchanges policy for all art purchases.
Description of Policy from Merchant:
What is your Policy on Returns/Exchanges/Refunds?
I take great pride in my work and prints, and I want you to be completely happy with your investment in my nature art. If for any reason you are unsatisfied with your print, you may return it within 14 days of delivery, and/or exchange it for another print. Prints must be returned in new condition, packaged carefully in the original packaging if possible. Your refund will be issued as soon as I receive the returned print. Please contact me if you would like to arrange a return or exchange.
In the event that you receive a damaged or defective print, please let me know within 7 days of receipt, and I will arrange for a new print to be shipped to you at no additional cost.
Verified Secure Website with Safe Checkout
This website provides a secure checkout with SSL encryption.
Verified Archival Materials Used
The Art Storefronts Organization has verified that this Art Seller has published information about the archival materials used to create their products in an effort to provide transparency to buyers.
Description from Merchant:
Fine Art Prints are made with high-quality archival inks on fine art papers using a high-resolution large format inkjet printer. Our premium archival inks produce images with smooth tones and rich colors. Prints are made with care on your choice of exquisite Fine Art Papers using a high-resolution large format inkjet printer. https://www.graphikprintworks.com
Become a supporter of Robbie George Photography and be the first to receive new content and special promotions.
“Every image is a field. Every quote is a key. Welcome back to the rhythm.” ~Robbie
Cart
Your cart is currently empty.
Saved Successfully.
This is only visible to you because you are logged in and are authorized to manage this website. This message is not visible to other website visitors.
Import From Instagram
Click on any Image to continue
This Website Supports Augmented Reality to Live Preview Art
This means you can use the camera on your phone or tablet and superimpose any piece of nature art onto a wall inside of your home or business.
To use this feature, Just look for the "Live Preview AR" button when viewing any piece of nature art on this website!