Seascape Shutter Speed Calculator – Water Texture Assistant
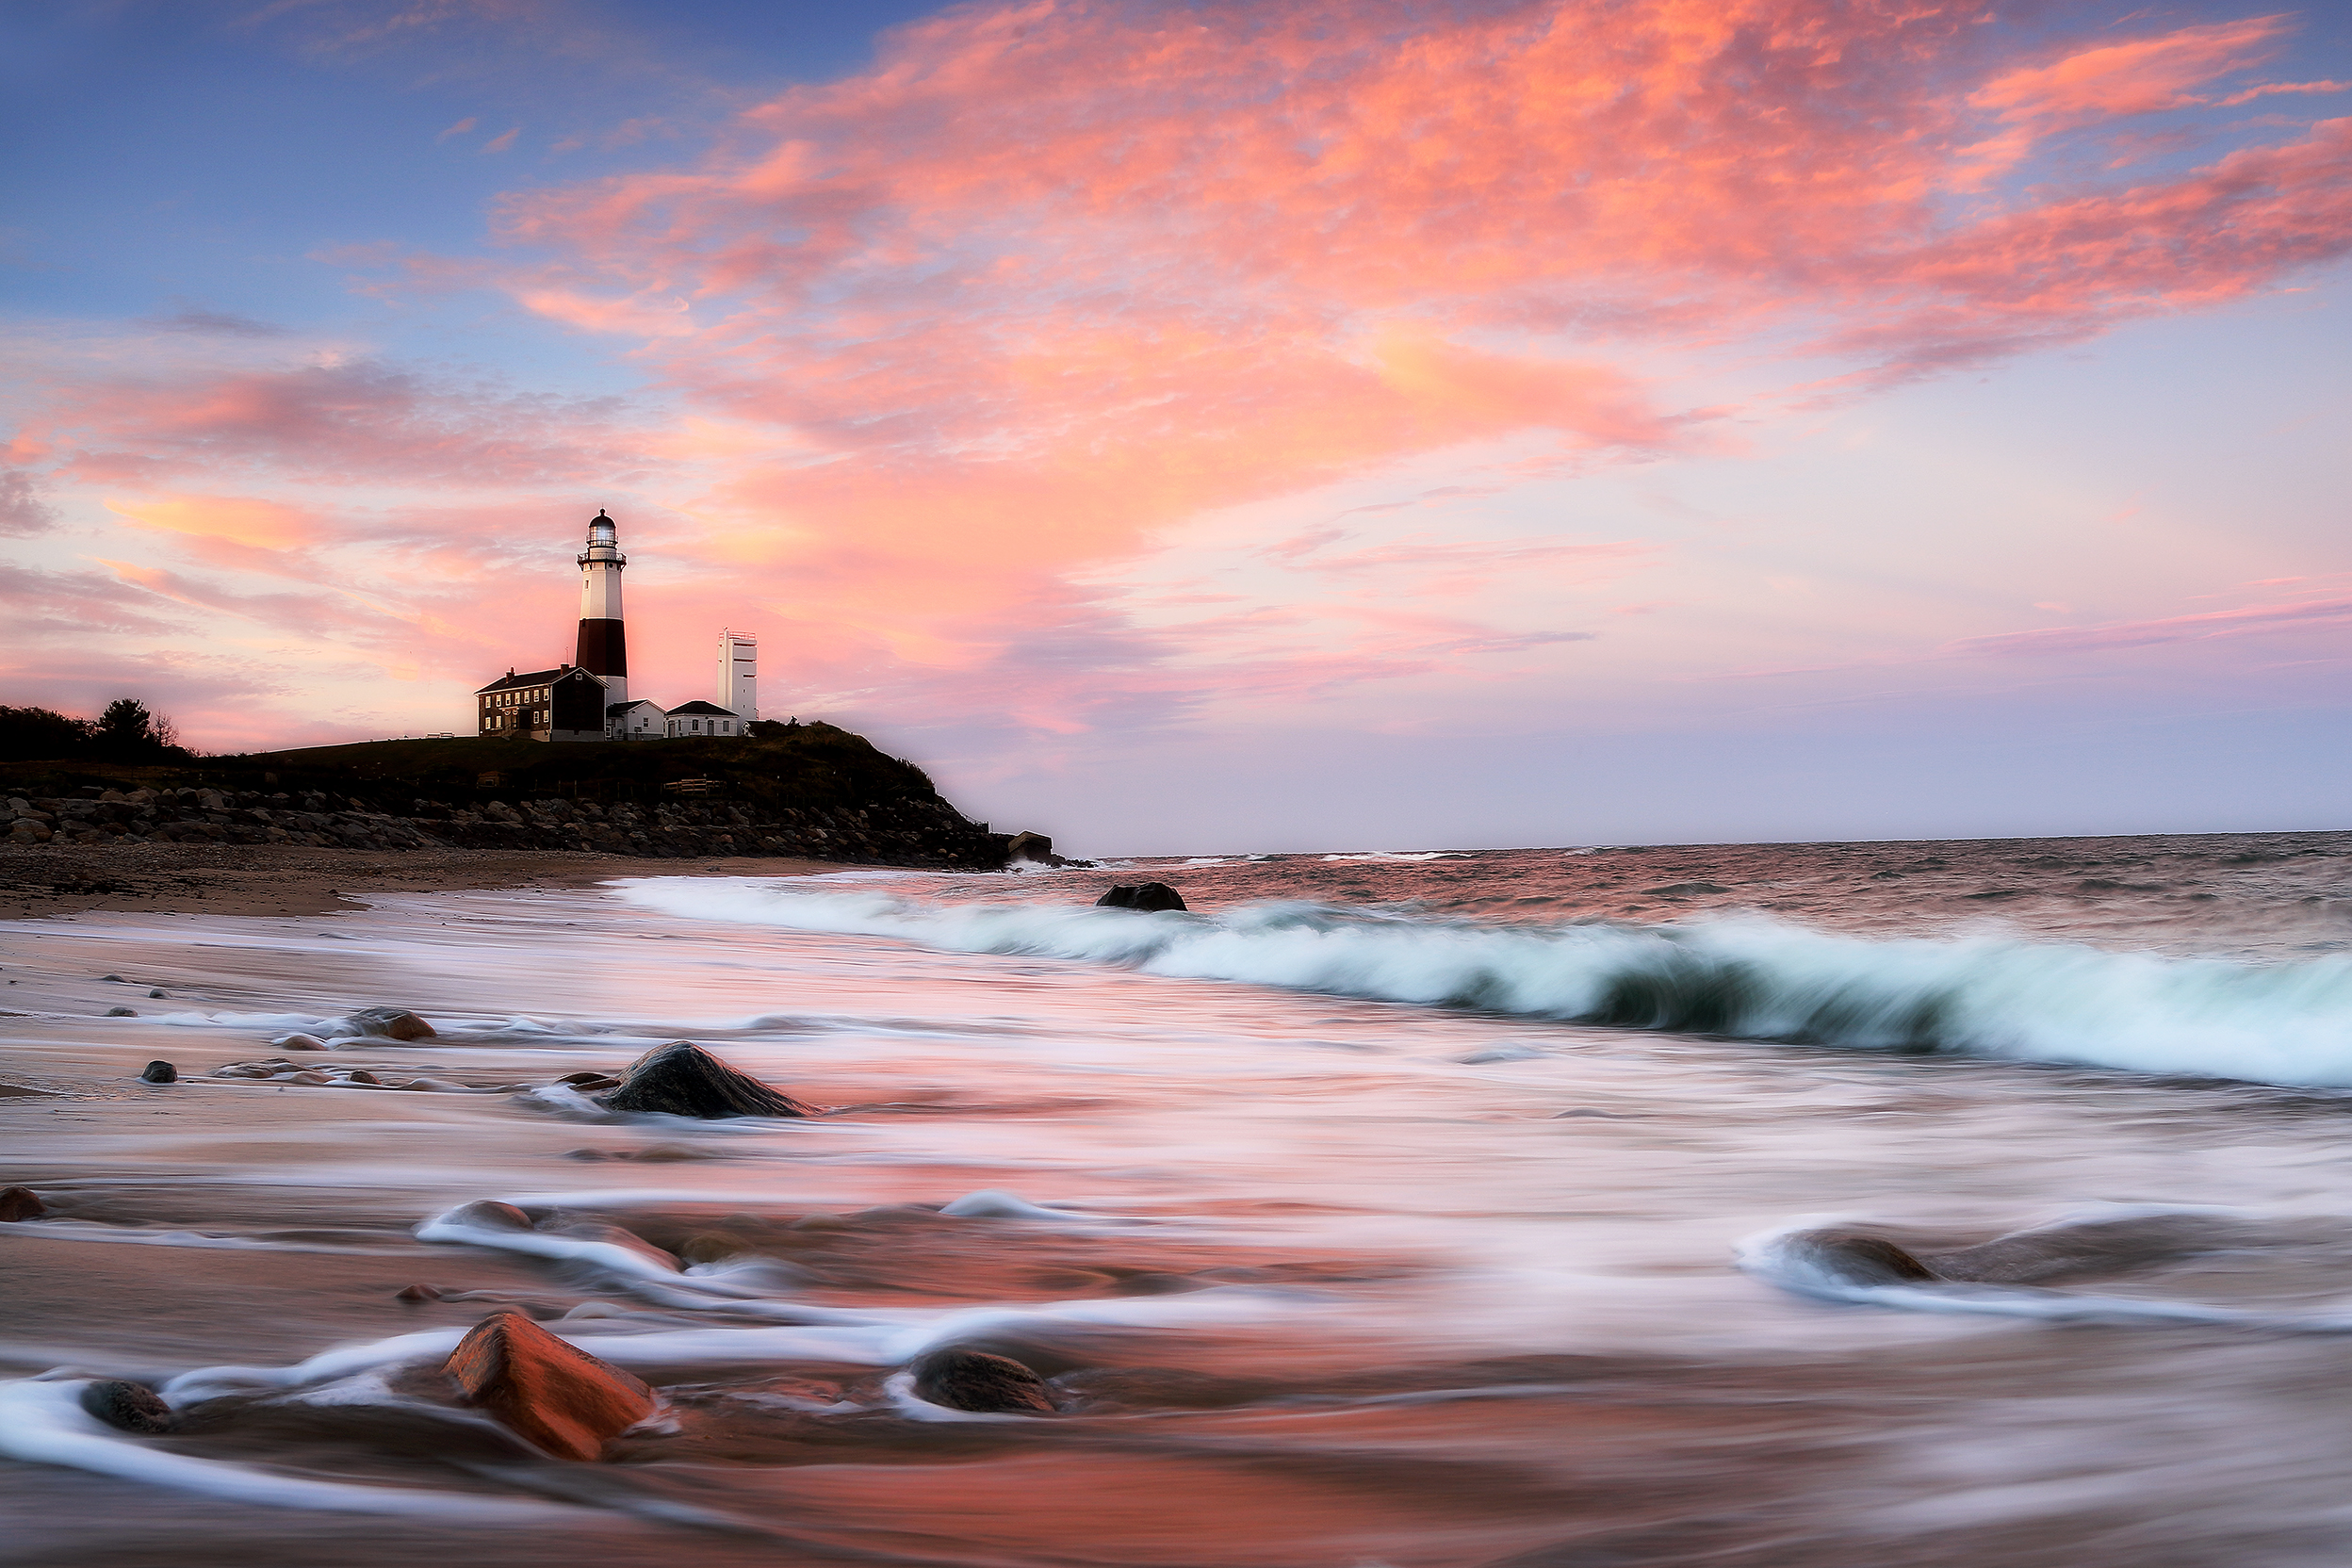
Montauk Lighthouse — where shutter speed changes the entire feel of moving water.
Seascape Shutter Speed Calculator
In seascape photography, shutter speed is not a technical afterthought — it is what decides whether the water feels calm, powerful, streaked, mist-like, or frozen in detail. The same shoreline can look completely different depending on how long you leave the shutter open.
This assistant helps you plan that decision before you shoot. Choose the water texture you want, factor in wave period, ND strength, focal length, and support, and get shutter-speed suggestions that fit the conditions you are working in.
What this tool helps you do:
Choose between silky, streaked, or crisp water textures
Adjust for wave timing and ND filter strength
Compare tripod and hand-held shutter limits
Build a stronger seascape plan before the light changes
Water texture changes fast. The same shoreline can look soft and glassy at one shutter speed, streaked and energetic at another, or completely frozen when the shutter is fast enough. This assistant helps you move from guesswork to a more intentional starting point.
Choose the look you want, factor in wave period, ND filter strength, focal length, support, and wind, and the tool will suggest a working shutter range that better matches the conditions in front of you.
How to Use the Tool
This assistant is built to answer a simple field question: what shutter speed will create the water texture I actually want in these conditions? The answer depends on more than taste alone. It depends on wave timing, filter strength, focal length, and how stable your setup really is.
Use the steps below to move from the look you want to a better working shutter-speed range before the light changes or the tide shifts.
1. Choose the Water Look
Start with the texture you want: silky, streaked, or crisp. This sets the basic shutter-speed direction before the other conditions refine it.
2. Estimate the Wave Period
Watch the water and estimate how many seconds pass between crests or surges. That timing changes how long an exposure needs to be to smooth, trail, or freeze motion.
3. Add ND and Focal Length
ND filters lengthen exposure time, while focal length changes how steady your camera needs to be. Together they strongly affect what shutter speeds are realistic in the field.
4. Set Support and Wind
A tripod in calm conditions can handle long exposures that would fall apart in wind or spray. Hand-held work has different limits, even with stabilization.
5. Use the Suggested Range
Read the base range, the ND-adjusted range, and the suggested target. Treat these as a strong starting point, not a rigid answer, because seascapes change moment by moment.
6. Bracket and Refine
Once you have a target shutter speed, make a few exposures above and below it. The difference between “good” and “exactly right” in moving water is often only a small timing change.
Field rule of thumb: choose the water feel first, then let the tool help you reach it. The strongest seascape shutter speed is not just technically correct — it matches the mood, movement, and shape of the scene in front of you.
Understanding Water Texture
In seascape photography, shutter speed does more than control exposure — it defines how movement is recorded. Water is constantly changing, and the length of your exposure determines whether that movement feels calm, directional, chaotic, or frozen in time.
This is why shutter speed is a creative decision first and a technical setting second. The goal is not just to expose the scene correctly, but to choose how the water behaves visually in the final image.
Silky Water (Long Exposure)
Longer shutter speeds smooth out movement and blend individual waves together. The result is a soft, flowing surface that emphasizes shape and reflection rather than individual motion.
This works well in calmer conditions, tidal pools, and scenes where you want the water to feel quiet and atmospheric rather than active.
Streaked Motion (Mid Exposure)
Mid-range shutter speeds allow movement to remain visible while still creating direction and flow. Waves stretch into lines or trails rather than disappearing completely.
This is often the most balanced look, especially in active surf where you want to show energy without losing structure.
Crisp Water (Fast Shutter)
Faster shutter speeds freeze motion and preserve detail in breaking waves, spray, and foam. Every shape is held in place instead of blending together.
This works best when the goal is to capture power, impact, or texture in the water itself rather than smoothing it into the scene.
Texture Type
Typical Shutter Range
Visual Effect
Silky
1–30+ seconds
Soft, smooth, atmospheric
Streaked
0.5–3 seconds
Directional flow, visible motion
Crisp
1/500–1/250 sec
Frozen detail, sharp wave structure
Key idea: water texture is not random — it is the result of timing your shutter to the rhythm of the waves. The same location can produce completely different images depending on how your exposure aligns with that movement.
ND Filters & Stability
Getting the shutter speed you want is not just about dialing a number. In most seascape conditions, especially during daylight, reaching longer exposures requires neutral density (ND) filters—and keeping those exposures sharp depends on how stable your setup really is.
This assistant combines both sides of that equation: how filters extend exposure time, and how wind, focal length, and support limit what is actually usable in the field.
How ND Filters Work
ND filters reduce the amount of light entering the lens, allowing you to use longer shutter speeds without overexposing the image. Each stop of ND doubles the exposure time.
For example, a 10-stop ND can turn a 1/8 second exposure into over a minute—making silky water possible even in bright conditions.
Common ND Strengths
Different ND strengths are useful for different conditions. The right choice depends on how bright the scene is and how long you want your exposure to be.
3-stop — subtle motion control in softer light
6-stop — strong streaking or moderate smoothing
10-stop — long exposures for silky water
Tripod vs. Hand-held
Hand-held shooting limits how slow your shutter can go before motion blur appears. Even with stabilization, there is a point where sharpness breaks down.
A tripod removes most of that limitation, allowing longer exposures—but only if the setup is stable enough to handle wind and vibration.
Wind, Spray & Real Conditions
Coastal conditions are rarely stable. Wind, shifting sand, and wave impact can all introduce vibration, even on a tripod.
This is why the assistant includes wind and support—because the theoretical shutter speed and the usable shutter speed are often different in the field.
ND Stops
Exposure Multiplier
Example
3 stops
×8
1/30s → ~1/4s
6 stops
×64
1/30s → ~2s
10 stops
×1024
1/8s → ~128s
Key idea: ND filters let you reach longer shutter speeds, but stability determines whether those exposures actually hold detail. The best results come from balancing both—not pushing one without considering the other.
Field Use Cases
The best shutter speed depends on the kind of shoreline you are photographing, the way the water is moving, and the role that motion plays in the composition. What works for a calm inlet usually fails in pounding surf, and what works for mist-like atmosphere can erase the very energy that makes a scene compelling.
Use these field examples as a practical guide for how to think about shutter speed in different seascape conditions.
Calm Water & Tidal Pools
In quieter water, longer exposures can smooth the surface into something glassy and minimal. This often works well when reflections, sky color, and stillness are the main visual elements.
Here, silky exposures often strengthen the scene because they reduce distraction and let the composition breathe.
Active Surf & Rolling Waves
Mid-range exposures often work best in surf because they hold direction and energy without dissolving everything into mist. This is where streaked motion usually becomes the strongest balance.
The goal is often to keep the movement visible enough that the shoreline still feels alive.
Breaking Waves on Rocks
When the scene depends on impact, spray, and the force of the water hitting rock, faster shutter speeds often make more sense. Crisp exposures preserve structure in foam and wave shape.
In these situations, freezing motion often says more about the place than smoothing it.
Foreground Flow Compositions
If the composition uses moving water as a leading line through foreground rocks or sand, streaked exposures often work beautifully. They create direction without erasing the shape of the flow.
This is often one of the most effective ways to use shutter speed compositionally in seascapes.
Horizon-Dominant Seascapes
In scenes where the sky, horizon, and distant light are more important than wave detail, longer exposures often help simplify the water and let the broader atmosphere take over.
The smoother water becomes, the more the composition leans into mood and space instead of motion.
Best approach: decide what role the water plays in the image first. Is it atmosphere, energy, structure, direction, or force? Once that is clear, the shutter-speed choice becomes much easier.
This assistant works best as part of a sequence. First you decide when the light is right, then you evaluate the shoreline, wave rhythm, and composition, and only then do you lock in the shutter speed that best matches the scene.
Think of this page as the motion-control layer in your field-planning stack. It helps answer how the water should be rendered once timing, place, and framing are already starting to come together.
1. Start with Light
Begin by identifying the best sunrise, sunset, golden hour, blue hour, or moonlight window for the coast or shoreline you want to shoot.
2. Confirm the Place
Use maps, field notes, or known location pages to decide whether the shoreline, rocks, tide pools, horizon, or surf pattern actually support the composition you have in mind.
3. Read the Water
Watch the wave rhythm, estimate the period, and decide what role the water should play: atmosphere, directional flow, frozen force, or a softer reflective surface.
4. Match the Gear
Choose ND strength, focal length, and tripod or hand-held setup based on the shutter range you need and the conditions you are working in.
5. Arrive Before the Window
Give yourself enough time to scout foregrounds, check incoming sets, clean the lens, and settle into position before the best light and wave pattern overlap.
6. Bracket Around the Target
Once you have a suggested shutter, make several exposures around it. Small changes in timing can dramatically change how the water feels in the final frame.
Practical sequence: light first, location second, wave rhythm third, shutter choice fourth. That order usually produces a much cleaner seascape plan than trying to solve everything once you are standing in the surf.
Once you know the shutter-speed range you want, the next step is to connect that choice to the rest of the field plan. In seascape work, shutter speed is only one layer—light, coastline shape, tide rhythm, and camera setup all influence whether the final image actually comes together.
These pages help you move from motion control into stronger location planning, timing, and seascape execution.
Best next move: use this assistant to narrow the water texture and shutter range first, then confirm whether the shoreline, light window, and wave behavior actually support the image you want to make.
Shutter speed in seascapes is not just a camera setting—it is a way of translating motion into form. The ocean is constantly shifting, and the way that movement is recorded depends on light, timing, energy, and distance.
This tool helps you make that decision in the field, while the pages below connect that decision to broader patterns in light, environment, and how motion is experienced in nature.
Light & Photons
Every shutter decision begins with light—how much reaches the sensor and how it interacts with moving water over time.
At a deeper level, seascape shutter decisions connect light, motion, and environment into a single experience—from what you observe in the field to what the final image conveys.
Common questions about shutter speed, water texture, ND filters, support, wave timing, and how to use this assistant in real seascape conditions.
What shutter speeds usually create silky, streaked, or crisp water?
Silky water usually comes from longer multi-second exposures, streaked motion often falls into shorter fractions of a second up to a few seconds, and crisp water usually requires fast shutter speeds like 1/500 to 1/250 second or faster. The exact range depends on how quickly the water is moving and what role motion plays in the composition.
Why does wave period matter?
Wave period helps describe the rhythm of the water. A long, slow swell behaves differently from short, choppy surf, and that changes how long your exposure needs to be if you want the movement to look smooth, directional, or frozen.
How do ND filters change shutter speed?
ND filters reduce the light entering the lens, allowing longer shutter speeds without overexposure. Each stop doubles the exposure time, so stronger ND filters are often what make longer silky-water exposures possible during bright conditions.
When should I use a tripod instead of shooting hand-held?
A tripod becomes important whenever the shutter speed is too slow to hold sharply by hand, especially for silky or streaked water. Hand-held shooting can work for faster crisp-water images, but longer exposures usually need a stable tripod setup to preserve detail in the rest of the scene.
How much do wind and spray affect long exposures?
A lot. Wind can shake the tripod, and sea spray can soften contrast or spot the lens between waves. That means the theoretical shutter speed you want is not always the shutter speed you can actually use cleanly in the field.
Is silky water always the best choice for seascapes?
No. Silky water works well when the goal is atmosphere, calm, or simplified form, but it can also remove the energy that makes a scene feel alive. Sometimes streaked or crisp water says more about the shoreline and the moment.
Should I still bracket around the suggested target shutter speed?
Yes. The assistant gives you a strong starting point, but moving water changes constantly. A few frames slightly faster or slower often make the difference between a usable file and the exact rendering you wanted.
How does this page fit into the rest of the field tools system?
This page handles the motion-control side of seascape photography. It works best alongside your golden hour and moon planning, location scouting, maps, and other field tools so the final shutter choice fits the broader conditions of the shoot.
About the Author
Robbie George is a National Geographic–published nature photographer whose work is built on field observation, timing, and the relationship between light, motion, and place.
In seascape photography, that field perspective often comes down to movement. Water is never still, and the choice of shutter speed determines whether that motion becomes atmosphere, structure, or energy within the image. This tool reflects that real-world decision-making process rather than a purely technical approach.
This page is part of the Robbie George Photography field tools system, connecting shutter-speed decisions to light timing, coastal conditions, field observation, and the broader Naturepedia framework behind how motion and environment are experienced in nature.
The presence of this badge signifies that this business has officially registered with the Art Storefronts Organization and has an established track record of selling art.
It also means that buyers can trust that they are buying from a legitimate business. Art sellers that conduct fraudulent activity or that receive numerous complaints from buyers will have this badge revoked. If you would like to file a complaint about this seller, please do so here.
Verified Returns & Exchanges
The Art Storefronts Organization has verified that this business has provided a returns & exchanges policy for all art purchases.
Description of Policy from Merchant:
What is your Policy on Returns/Exchanges/Refunds?
I take great pride in my work and prints, and I want you to be completely happy with your investment in my nature art. If for any reason you are unsatisfied with your print, you may return it within 14 days of delivery, and/or exchange it for another print. Prints must be returned in new condition, packaged carefully in the original packaging if possible. Your refund will be issued as soon as I receive the returned print. Please contact me if you would like to arrange a return or exchange.
In the event that you receive a damaged or defective print, please let me know within 7 days of receipt, and I will arrange for a new print to be shipped to you at no additional cost.
Verified Secure Website with Safe Checkout
This website provides a secure checkout with SSL encryption.
Verified Archival Materials Used
The Art Storefronts Organization has verified that this Art Seller has published information about the archival materials used to create their products in an effort to provide transparency to buyers.
Description from Merchant:
Fine Art Prints are made with high-quality archival inks on fine art papers using a high-resolution large format inkjet printer. Our premium archival inks produce images with smooth tones and rich colors. Prints are made with care on your choice of exquisite Fine Art Papers using a high-resolution large format inkjet printer. https://www.graphikprintworks.com
Become a supporter of Robbie George Photography and be the first to receive new content and special promotions.
“Every image is a field. Every quote is a key. Welcome back to the rhythm.” ~Robbie
Cart
Your cart is currently empty.
Saved Successfully.
This is only visible to you because you are logged in and are authorized to manage this website. This message is not visible to other website visitors.
Import From Instagram
Click on any Image to continue
This Website Supports Augmented Reality to Live Preview Art
This means you can use the camera on your phone or tablet and superimpose any piece of nature art onto a wall inside of your home or business.
To use this feature, Just look for the "Live Preview AR" button when viewing any piece of nature art on this website!